I have undertaken the development of a project called “Facial-Recognition-Attendance,” in which we are implementing a real-time attendance system utilizing Python.
You can also check the project on Github:
https://github.com/singhAnike/Facial-Recognition-Attendance
Step 1: Project Introduction
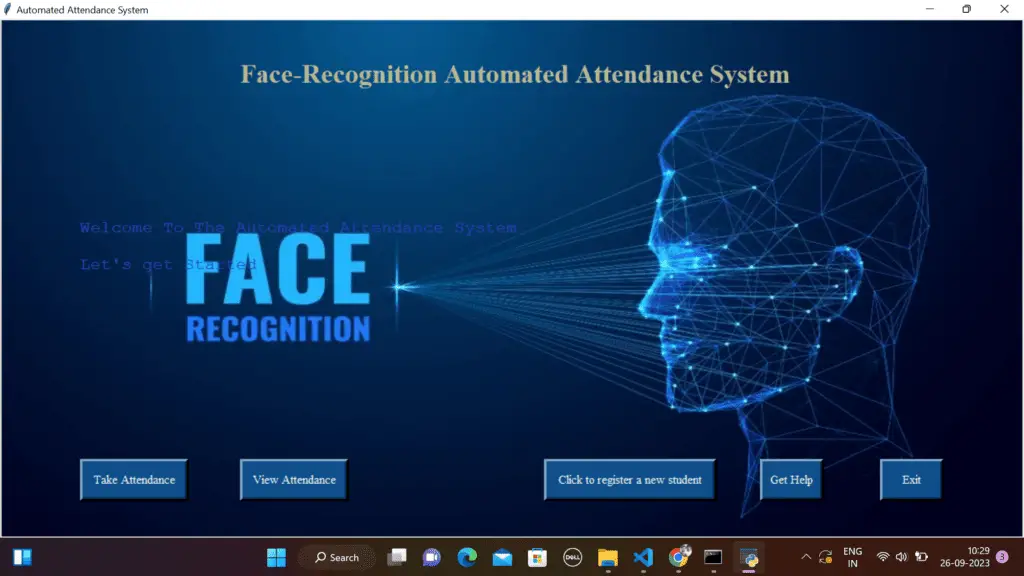
This project implements a real-time attendance system using facial recognition technology. It captures attendance data, including names, current date, and time, and records it in an Excel sheet. The graphical user interface (GUI) allows users to take attendance, view records, register new students, get help, and exit the program.
Step 2: Prerequisites
Before getting started, make sure you have the following prerequisites in place:
- Python installed on your system (3.7 or higher).
- Required Python libraries installed:
opencv-python,face_recognition,Pillow(PIL), andtkinter. - Webcam or camera connected to your computer.
Step 3: Set Up the Project
- Clone or download the project from the GitHub repository.
git clone https://github.com/singhAnike/Facial-Recognition-Attendance
Code language: PHP (php)- Navigate to the project directory:
cd Facial-Recognition-Attendance
Step 4: Install Dependencies
Install the required Python libraries using pip:
pip install opencv-python opencv-python-headless face_recognition pillow
Step 5: Run the Program
To run the program, execute the gui.py script:
python gui.pyCode language: CSS (css)I explained about this file in the overview section.
Step 6: Using the Program
The graphical user interface (GUI) provides several options:
Taking Attendance
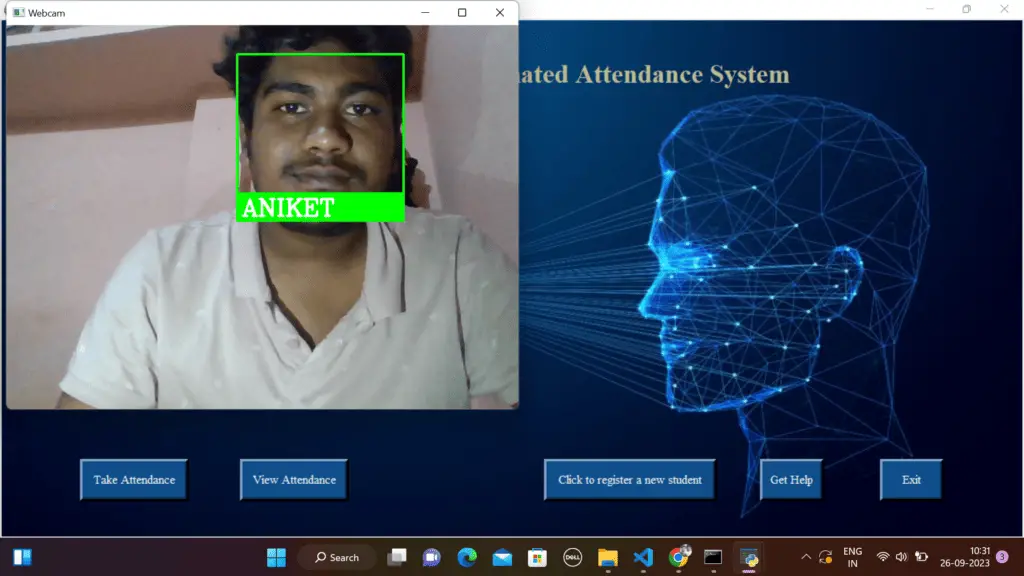
- Click the “Take Attendance” button.
- Wait for the system to start recognizing faces using your camera.
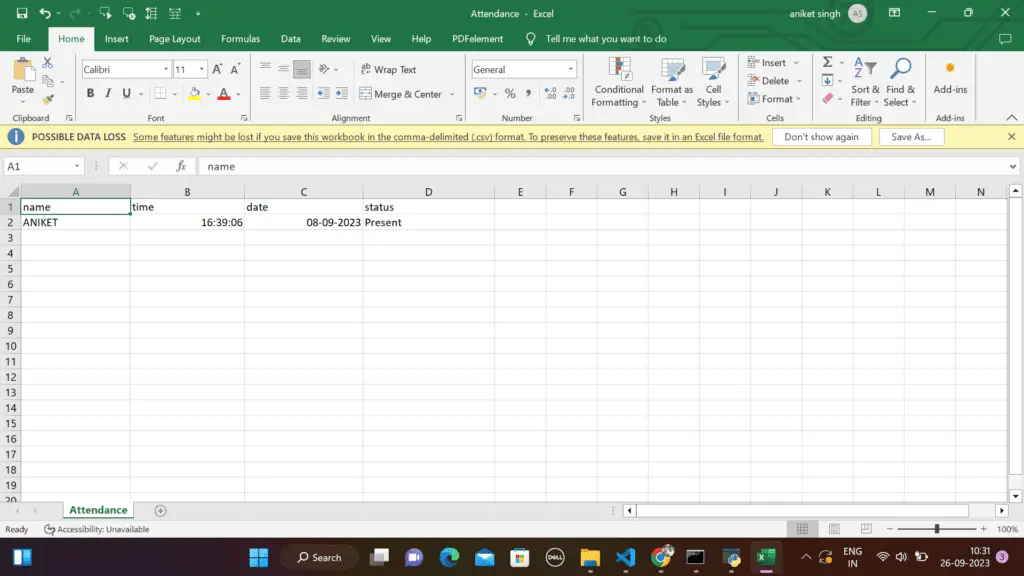
- The system will display recognized names on the video feed and record attendance in the
Attendance.csvfile.
Viewing Attendance Records
- Click the “View Attendance” button.

- This will open the
Attendance.csvfile, which contains attendance records.
Registering a New Student
- Click the “Click to register a new student” button.
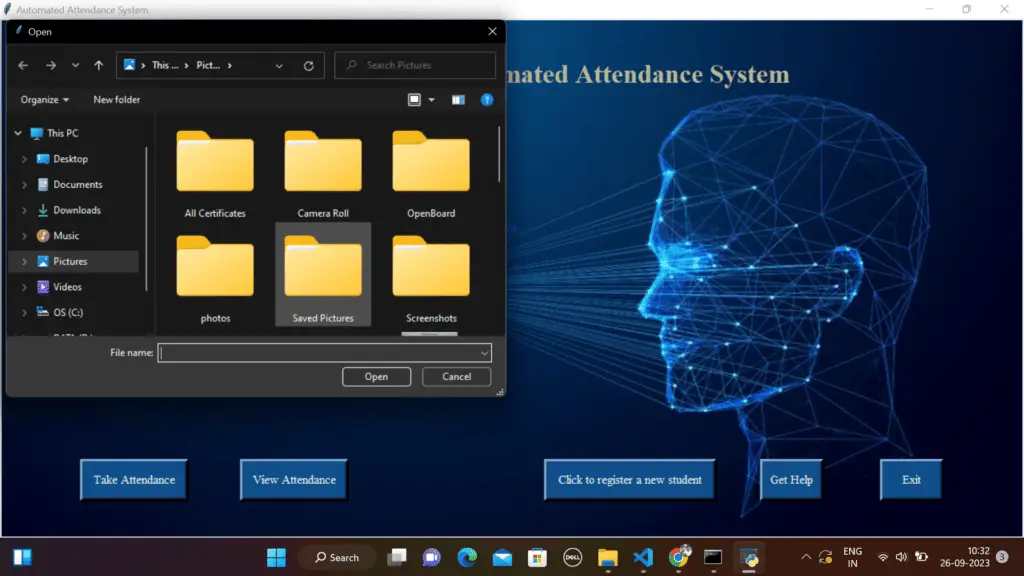
- Select an image of the new student’s face from your computer.
- The system will use this image for future recognition.
Getting Help
- Click the “Get Help” button.
- A web page with additional information or support will open in your web browser.
Exiting the Program
- To exit the program, click the “Exit” button.
Congratulations! You have successfully set up and used the “Facial-Recognition-Attendance” project to take attendance using facial recognition technology.
You can further customize and extend this project as needed for your specific use case.
Overview Of The Code:
Project directory details;
Facial-Recognition-Attendance
/
|-- Backg-images/
|   |-- face-recognition.jpg
|-- images/
|   |-- place your known individuals' images here
|-- faceencoding.py
|-- gui.py
faceencoding.py:
Here’s a breakdown of the key functions and what they do:
faceEncodings(images):- This function takes a list of images as input.
- It processes each image to extract facial encodings using the
face_recognitionlibrary. - The computed encodings are returned as a list.
attendance(name):- This function takes a person’s name as input.
- It opens a CSV file named “Attendance.csv” and checks if the name is already present in the file.
- If the name is not found, it adds a new entry with the current time and date, marking the person as “Present.”
perform_face_recognition(encodeListKnown, personNames):- This function performs real-time face recognition using the computer’s webcam.
- It captures video from the webcam using OpenCV (
cv2.VideoCapture) and continuously processes each frame. - It detects faces in each frame, encodes them, and compares the encodings with a known list of encodings (
encodeListKnown) for registered individuals. - If a match is found, it identifies the person’s name and marks their attendance using the
attendancefunction. - The recognized face is highlighted with a green rectangle in the video feed, and their name is displayed on top.
take_attendance():- This function initiates the attendance-taking process.
- It first reads a directory of images (presumably containing known faces) from the “images” folder and extracts their encodings.
- The names of the individuals are derived from the image filenames.
- The
perform_face_recognitionfunction is then called with the list of known encodings and corresponding names.
show_attendance():- This function is responsible for opening the “Attendance.csv” file.
- It uses
os.startfileto open the file with the default system program for CSV files. - If the file is not found, it displays a message box indicating that the attendance file was not found.
It’s important to note that this code relies on several external libraries, including OpenCV (cv2), face_recognition, and tkinter.messagebox. Additionally, the code assumes the existence of image files in the “images” directory and a CSV file named “Attendance.csv” for storing attendance records.
Here is the Full Code;
import cv2
import csv
import numpy as np
import face_recognition
import os
from datetime import datetime
import tkinter.messagebox


def faceEncodings(images):
    encodeList = []
    for img in images:
        img = cv2.cvtColor(img, cv2.COLOR_BGR2RGB)
        encode = face_recognition.face_encodings(img)[0]
        encodeList.append(encode)
    return encodeList

def attendance(name):
    with open('Attendance.csv', 'r+') as f:
        myDataList = f.readlines()
        nameList = []
        for line in myDataList:
            entry = line.split(',')
            nameList.append(entry[0])

        if name not in nameList:
            time_now = datetime.now()
            tStr = time_now.strftime('%H:%M:%S')
            dStr = time_now.strftime('%d/%m/%Y')
            f.writelines(f'\n{name},{tStr},{dStr},{"Present"}')

def perform_face_recognition(encodeListKnown, personNames):
    cap = cv2.VideoCapture(0)

    def convert_to_rgb(faces):
        faces = cv2.cvtColor(faces, cv2.COLOR_BGR2RGB)
        return faces

    while True:
        ret, frame = cap.read()
        faces = cv2.resize(frame, (0, 0), None, 0.25, 0.25)
        faces = convert_to_rgb(faces)

        facesCurrentFrame = face_recognition.face_locations(faces)
        encodesCurrentFrame = face_recognition.face_encodings(faces, facesCurrentFrame)

        for encodeFace, faceLoc in zip(encodesCurrentFrame, facesCurrentFrame):
            matches = face_recognition.compare_faces(encodeListKnown, encodeFace)
            faceDis = face_recognition.face_distance(encodeListKnown, encodeFace)
            matchIndex = np.argmin(faceDis)

            if matches[matchIndex]:
                name = personNames[matchIndex].upper()

                y1, x2, y2, x1 = faceLoc
                y1, x2, y2, x1 = y1 * 4, x2 * 4, y2 * 4, x1 * 4
                cv2.rectangle(frame, (x1, y1), (x2, y2), (0, 255, 0), 2)
                cv2.rectangle(frame, (x1, y2 - 35), (x2, y2), (0, 255, 0), cv2.FILLED)
                cv2.putText(frame, name, (x1 + 6, y2 - 6), cv2.FONT_HERSHEY_COMPLEX, 1, (255, 255, 255), 2)
                attendance(name)

        cv2.imshow('Webcam', frame)
        if cv2.waitKey(1) == 13:
            break

    cap.release()
    cv2.destroyAllWindows()

def take_attendance():
    tkinter.messagebox.showinfo("Encoding Start.", "Please wait a few seconds")
    path = 'images'
    images = []
    personNames = []
    myList = os.listdir(path)

    for cu_img in myList:
        current_Img = cv2.imread(f'{path}/{cu_img}')
        images.append(current_Img)
        personNames.append(os.path.splitext(cu_img)[0])
    print(personNames)
    encodeListKnown = faceEncodings(images)
    tkinter.messagebox.showinfo("Encoding Completed.", "All Encodings Complete!!!")
    perform_face_recognition(encodeListKnown, personNames)

def show_attendance():
    try:
        os.startfile("Attendance.csv")
    except OSError:
        tkinter.messagebox.showinfo("File Error", "Attendance file not found!")Code language: JavaScript (javascript)
gui.py:
- It creates a tkinter GUI window with a background image and buttons for taking attendance, viewing attendance, registering new students, getting help, and exiting the program.
- The GUI is responsive and resizes the background image when the window size changes.
- The buttons are linked to corresponding functions defined in
faceencoding.py.
Here’s an explanation of the key parts of the code:
- Import Statements:
- The code begins by importing necessary modules and libraries, including:
tkinter(imported asTk) for GUI components.filedialogfromtkinter(imported asfd) for file dialog functionality.PILfor working with images.webbrowserfor opening web links.faceencoding(presumably a custom module) for face recognition functions.
- The code begins by importing necessary modules and libraries, including:
- Creating the GUI Window:
- An instance of the main tkinter window is created and stored in the variable
win. - The window’s size is set to match the screen dimensions.
- An instance of the main tkinter window is created and stored in the variable
- Setting Background Image:
- An image file (
bg_image_path) is loaded and displayed as the background of the GUI.
- An image file (
resize_imageFunction:- This function is used to resize the background image when the window is resized. It also updates text elements on the canvas.
- It is bound to the
<Configure>event of the window, so it’s called when the window is resized.
- Buttons:
- Several buttons are created using the
Buttonwidget, including:- “Take Attendance”
- “View Attendance”
- “Click to register a new student”
- “Get Help”
- “Exit”
- Each button has its own unique appearance and functionality, which is defined by associated functions.
- For example, the “Take Attendance” button has a
commandattribute set totake_attendance, indicating that it should execute thetake_attendancefunction when clicked.
- Several buttons are created using the
new_registrationFunction:- This function is called when the “Click to register a new student” button is clicked.
- It opens a file dialog to select a file and presumably performs some registration or processing based on the selected file.
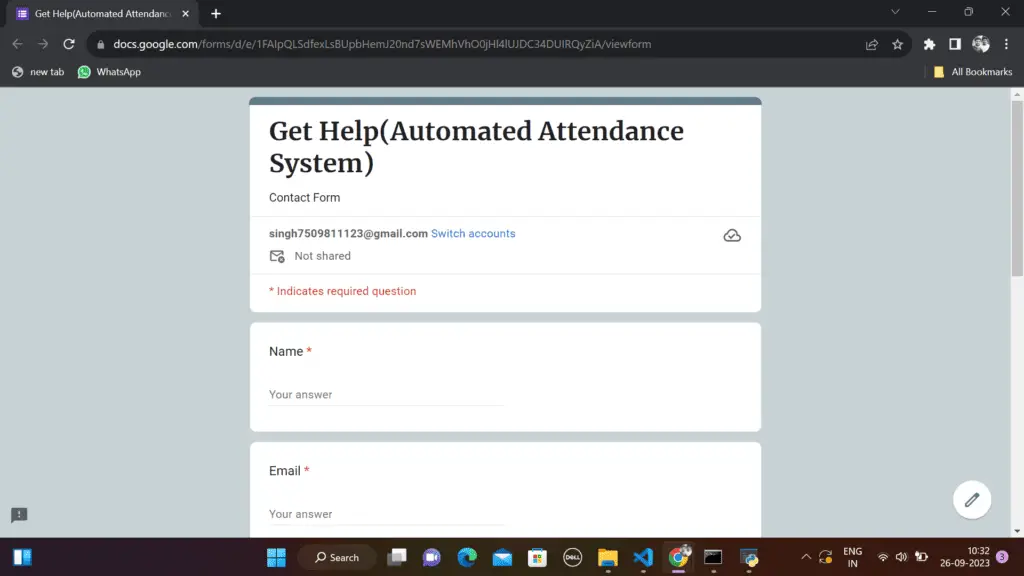
helpFunction:- This function is called when the “Get Help” button is clicked.
- It opens a web browser with a specified URL for help.
exit_programFunction:- This function is called when the “Exit” button is clicked.
- It destroys the main GUI window, effectively exiting the program.
- Displaying Elements:
- The code uses
Canvasto display background images and buttons on the GUI. - Buttons are placed on the canvas at specific coordinates.
- The code uses
- Main Loop:
- The
mainloopfunction of the Tkinter window (win) is called, starting the GUI’s main event loop, which handles user interactions and updates.
- The
Here is the Full Code;
from tkinter import *
from tkinter import filedialog as fd
from PIL import ImageTk, Image
import webbrowser
from faceencoding import*

# GUI Implementation for Automated Attendance System
win = Tk()

width = win.winfo_screenwidth()
height = win.winfo_screenheight()

# Fix tkinter window size
win.geometry("%dx%d" % (width, height))

# Set Background Image
bg_image_path = "Backg-images/face-recognition.jpg"
bg = ImageTk.PhotoImage(file=bg_image_path)

# Create a Canvas
canvas = Canvas(win, width=750, height=3500)
canvas.pack(fill=BOTH, expand=True)

# Add Image inside the Canvas
canvas.create_image(0, 0, image=bg, anchor='nw')

# Function to resize the window
def resize_image(e):
    global image, resized, image2
    # open image to resize it
    image = Image.open(bg_image_path)
    # resize the image with width and height of root
    resized = image.resize((e.width, e.height), Image.ANTIALIAS)
    image2 = ImageTk.PhotoImage(resized)
    canvas.create_image(0, 0, image=image2, anchor='nw')
    # welcome
    canvas_id = canvas.create_text(100, 250, anchor="nw")
    canvas.itemconfig(
        canvas_id, text="Welcome To The Automated Attendance System\n\nLet's get Started"*1, width=780,)
    canvas.itemconfig(canvas_id, font=("courier", 16), fill='#4343CD')
    canvas.insert(canvas_id, 16, "")
    # heading
    canvas_h = canvas.create_text(300, 50, anchor="nw")
    canvas.itemconfig(
        canvas_h, text="Face-Recognition Automated Attendance System"*1, width=800)
    canvas.itemconfig(canvas_h, font=("Times New Roman bold", 25), fill='#BCBC8F')
    canvas.insert(canvas_h, 16, "")

# Bind the function to configure the parent window
win.bind("<Configure>", resize_image)
# Title of this application
win.title("Automated Attendance System")

# Creating buttons
# Creating The Button For Taking Attendance
button1 = Button(win, text="Take Attendance",
                 bg='DodgerBlue4', fg='white', height='2', width='15', border='5', font=("Times New Roman", 11), command=take_attendance)
button1.pack(pady='10')

# Creating The Button To show Attendance
button2 = Button(win, bg="DodgerBlue4", fg="white", text="View Attendance",
                 height='2', width='15', border='5', font=("Times New Roman", 11), command=show_attendance)
button2.pack(pady='10')

# New student registration function
def new_registration():
    file = fd.askopenfilename(initialdir="C:/Users/immra/OneDrive/Pictures")
    fob = open(file, 'r')

# Button for Add new student
button3 = Button(win, bg="DodgerBlue4", fg="white", text="Click to register a new student",
                 border='5', height='2', width='25', font=("Times New Roman", 11), command=new_registration)
button3.pack()

# Function definition
def help():
    webbrowser.open("https://forms.gle/NkFb5ASxxyZSvM426")

# Button for Help
button4 = Button(win, bg="DodgerBlue4", fg="white", text="Get Help",
                 height='2', width='8', border='5', font=("Times New Roman", 11), command=help)
button4.pack()

def exit_program():
    win.destroy()

# Button for Exit From window
button5 = Button(win, bg="DodgerBlue4", fg="white", text="Exit", height='2',
                 width='8', border='5', command=exit_program, font=("Times New Roman", 11))
button5.pack()

# Display image
canvas.create_image(0, 0, image=bg, anchor="nw")

# Display Buttons
button1_canvas = canvas.create_window(100, 550, anchor="nw", window=button1)
button2_canvas = canvas.create_window(300, 550, anchor="nw", window=button2)
button3_canvas = canvas.create_window(680, 550, anchor="nw", window=button3)
button4_canvas = canvas.create_window(950, 550, anchor="nw", window=button4)
button5_canvas = canvas.create_window(1100, 550, anchor="nw", window=button5)

# Run the main loop
win.mainloop()Code language: PHP (php)
What You Learn From This Project?
From the provided code for creating an Automated Attendance System with Face Recognition and the tutorial on how to set up and use it, here are some key takeaways:
- Integration of Libraries: The code demonstrates the integration of various Python libraries, including OpenCV, face_recognition, Pillow (PIL), and tkinter. These libraries are essential for building a face recognition-based attendance system and creating a graphical user interface.
- Face Recognition: The code utilizes the face_recognition library to detect and recognize faces in images captured by a webcam. It demonstrates how to encode known faces and compare them to the faces detected in real-time video frames.
- Graphical User Interface (GUI): The tkinter library is used to create a user-friendly GUI for the attendance system. It includes buttons for taking attendance, viewing attendance records, registering new students, getting help, and exiting the program.
- File Handling: The code involves file handling, particularly reading and writing to CSV files. It maintains an “Attendance.csv” file to keep track of attendance records.
- Responsive Design: The GUI design is responsive, adjusting to changes in the window size. This makes the application visually appealing and user-friendly on different screen sizes.
- Modularity: The code is organized into separate Python scripts (
faceencoding.pyandgui.py) to promote modularity and maintainability. This separation allows for easier maintenance and future enhancements. - User Interaction: The tutorial guides users through the process of setting up the project, running the application, and performing various tasks like taking attendance and viewing records.
- Prerequisites and Dependencies: The tutorial emphasizes the importance of having the necessary prerequisites (Python and required libraries) and how to install them using
pip. This ensures a smooth setup process. - Project Structure: It provides guidance on organizing the project directory with subdirectories for images and background images, making it easier to manage project assets.
Overall, this code and tutorial serve as a practical example of how to create an attendance system with face recognition technology, making it accessible for educational institutions, businesses, or other organizations that require automated attendance tracking. It also highlights the importance of using existing libraries and frameworks to streamline the development process.
Read More;
- Python Detach Subprocess And Exit
- How to use the subprocess Popen.communicate() method
- Python Subprocess Output To File
- Python Subprocess Output To Variable
- Multiple Commands With SSH Using Python Subprocess
- Python Subprocess Run In Background
- Python Execute Shell Command And Get Output
- subprocess-exited-with-error in Python
- Python Subprocess’ Stdin
- Learn Subprocess.run() in Python
- subprocess.Popen to multiprocessing
- Python Subprocess Multiple Arguments